Rob's TIMSS Blog

My discoveries and ramblings of TIMSS/Personify.

Sunday, February 26, 2006

TIMSS 6: Changing Phone Locations

In TIMSS 6, a phone/internet address location was part of what made the entry distinct in the database, thus once it is entered, you can't change it.

In TIMSS 6.1.7, a new button was added to the demographic screens (CUS001 & MRM001) above the customer business card called Update Contact Info. This button opens a window where you can quickly edit and enter primary Phone/Fax/eMail/Web numbers and addresses... a nice addition.


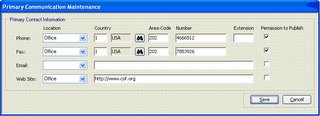
On this screen, you will notice that for existing entries the location drop down is active and you can change the entry's locations. However, this does not actually change the location.

What it does is create a new contact entry of that type with the same number/address with the location you changed it to, just as if you had re-entered it with that location and made it primary. The old location still exists for the customer with the same number/address but it is no longer primary.

Please note that any phone change logs that were associated with this entry (and anwhere else the number/address was specifically referenced) are still linked to the original location. All you really did was create a new number/address at a new location that happens to be the same as an existing number/address, and made it primary.

Applies to: TIMSS6

Wednesday, February 22, 2006

TIMSS 6: Setups for Phone Number Integrity

In TIMSS 6 I've noticed a couple things you can do to help with data integrity of phone numbers.

First, the COMM_LOCATION type has a default value and a display order. The default value is available for all types on the top half of the APP005 screen. You can set a default value, but I would recommend not doing this for phone locations. The main reason I would not is that once it is set, you can't change it.

If all your phone numbers were WORK phones, then go ahead and default it in. However, if you really want to track the location, and it's defaulted in, I bet 99% of you phone number will be entered as WORK and none will be HOME or anything else. And since once it's entered into TIMSS as WORK you can't really change it, I'd opt not to default it in (alright, you can change it, but it's not straight forward).

The one thing I would do is set the Display Order for the codes under COMM_LOCATION to display in the order they are most often used (i.e. putting WORK at the top and CELL at the bottom).

Second, when defining the phone format for a country, you can set the min and max length of a particular field. For the US and Canada the area code is 3 and the phone number is 7, so you can set the min and max for both to 3 and 7, respectively. This will make sure users enter the correct number of digits.


One way this really helps with when people enter the area code, hit tab, enter the 3 digit prefix, hit tab (moving to the extension field) and enter the last 4 digits of the number. If you have set the phone number length (max & min) to 7, this will throw and error when the user tries to save.

Applies to: TIMSS6

Monday, February 20, 2006

Extender Script: Default Language

TIMSS 6 supports multiple languages. One place you will see this is in product setup screens on the Product Description, Brief Description, & Long Description tabs where you can enter different descriptions for each language.

If your organization is like mine, we only use English. Thus choosing English every time we enter a description is a bit tedious. I have some pity for my end users, so using Extender Scripting I have set the default value to English.

The example below is from the Web Control- Long Description tab. I've added code to the event that fires after the Add Text button has been clicked.

Public Sub cmdAddLangDesc_AfterAction ( ByRef MyForm As Object, ByRef MyControl As Object)
MyForm.getFormControlByName("cboLanguage").Value="EN-US"
MyForm.getFormControlByName("cboLanguage").Text="English - US"
MyForm.getFormControlByName("rbPlainText").checked=True
End Sub


The Value is the code that is stored in the database, and the Text is the value (code's description) that's displayed on the screen. You will also notice that I've set the Plain Text radio button to checked.

And so when the user clicks the Add Text button, the Language is initially set to "English-US" and the Plain Text radio button is checked. These are just the initial values when the button is clicked and can still be changed to other values.


I'm sure in a future release you will be able to set a default language for the application, however this is a good example of how to set default values on screens.

Applies to: TIMSS6

Wednesday, February 15, 2006

Email Address Verification

Wouldn't it be great if you could check the validity of an email address that was entered into TIMSS? Well you can. I use a program called Advanced Email Verifer from G-Lock Software which contacts the address domain's SMTP server to validate the email address.

Daily (or close to it) I pull a list of newly entered or modified email address in TIMSS and import them into AEV and let it try and validate the addresses. The ones that it thinks are bad, I check for obvious errors (typos in name or domain) and try and re-vailidate them. If they are still comming as bad, I ask the person who entered them to verify them. It's not 100% accurate, but it does help a lot. If I'm pretty sure it's bad, I'll put the error message in the comments field in TIMSS and make the address in-active.

I have an older version of the software. The new one, which is $99, will apparently attach directly to a database.


Applies to: TIMSS5 & TIMSS6

Saturday, February 11, 2006

Integrating Crystal Reports into TIMSS 6

There are 2 ways for TIMSS users to include their own Crystal Reports in TIMSS 6, either as an online report linked to a TIMSS screen, or as a TRS (BATCH) process.

The online reports can be linked to a screen in TIMSS and certain data can be passed from that screen to the Crystal Report. Putting the reports online makes it easier for users to find and run the reports they need.

TRS reports are submitted to the TRS server. The advantage here is that the output is saved on the TRS server and processes that take long times can be submitted and the user can then work on other things. TRS reports can also be scehduled.

The Crystal Report

The Crystal Report that you are going to integrate needs to be created with an ODBC (RDO) connection to the TIMSS database. Also make sure that the Parameter names in the report do not have any spaces in them.

The report should be stored on the TRS Server in the …\TRS\APPL\CUSTOM folder. Any report you create or modify should be placed here so that it is not overwritten in upgrades. (You may use the Upload Report File button to put the file in the correct directory).

Creating an Online report

  1. Open TRS001 – TRS Application Setup.
  2. Click on New to create new custom report application.
  3. Select the appropriate subsystem.
  4. For Application, use the subsystem extension and a number ranging from 7000 to 9999 (this range is reserved for Client Custom Reports (i.e. FAR7001, MBR8001 etc…).
  5. Give a Report description.
  6. Select Submit Type as ONLINE - Available for Online submission.
  7. Select Application Type as CRYSTAL - Crystal Report.
  8. Type in the report file name (i.e. FAR7001.rpt) in the Program File field. (You may use the Upload Report File button to put the file in the correct directory).
  9. Click on Refresh Parameters Button – it will automatically upload the parameter setup from report file to TRS Setup. (NOTE: Parameter names cannot have spaces in TIMSS or the Crystal Report)
  10. Review the Parameter setup in the grid and make the changes as required. Data Field Name is what is passed from the TIMSS Screen. Possible values can be seen on TRS101 on the Values Passed From Screen tab when submitting the report from a particular screen.
  11. On the Linked to Screen tab hit the plus to add screens where this report can be run. The Report Category is what folder the report will be found under. You can use the existing ones, or create your own in the REPORT_CATEGORY type in the System Types and Code.
  12. Save the Application.

You have now created the online report. You will next need to setup security for it. Under Application Access (SEC003B) pull up the Application name you gave the report above (i.e. FAR7001, MBR8001 etc…) and pick the groups who can run this report.

Creating a TRS Report

  1. Create a new application setup from TIMSS TRS001 – TRS Application setup screen.
  2. Set Submit Type to BATCH
  3. Set Application Type to CRYSTAL
  4. Set the Program file to TRSRunCrystal.exe
  5. On the Job parameter tab, the first column, Parameter name must match with the parameter name given in Crystal Report. (NOTE: Parameter names cannot have spaces in TIMSS or the Crystal Report).
  6. On the Job files tab, add a row for “File type” as “Crystal Report File”. For File name, enter your crystal report file name (do not include the .rpt extension- “FAR7001.rpt” is entered as “FAR7001”
  7. Save the application.

You have now created the TRS report. You will next need to setup security for it. Under Application Access (SEC003B) pull up the Application name you gave the report above (i.e. FAR7001, MBR8001 etc…) and pick the groups who can preview & submit this.

Finally you need to create a setup for the process.

  1. Under Reporting, open Job Parameter Setup (TRS002).
  2. Find the Process you created (FAR7001) under the category you placed it in.
  3. Click the New User Setup button to create a new setup
  4. Fill in the Code & Description and pick a Job Queue.
  5. In the Job Parameters you should see your report parameters. You can set the Prompt value to Yes if you want the user to get a prompt for this value when the report is submitted.

Applies to: TIMSS6

Tuesday, February 07, 2006

TIMSS 6: Report of Your Custom Reports

On of the many niceties of TIMSS 6 is the ability incorporate your own Crystal Reports into the application. If you name them consistently, you can create a report to list all of the reports you've added to TIMSS.

My naming scheme has been to name them with the 3 letter module plus a number starting with 8000. For example MTG8007.

In a Crystal Report, you can find these by looking for an 8 as the 4 character and making sure that the length is greater than 6 (to exclude things like FAR800). The filter in Crystal would look like:

InStr ({TRS_APPLICATION.APPLICATION},'8') = 4 and Length ({TRS_APPLICATION.APPLICATION})>6

If you are the only user adding reports, you might use the ADDOPER to find your custom reports.

The data for the reports can be found in 3 tables:


  1. TRS_APPLICATION- has APPLICATION_TYPE_CODE (CRYSTAL/BATCH), HELP_TEXT, SUBMIT_TYPE_CODE (ONLINE/BATCH)
  2. TRS_APPLICATION_LINK- has APPLICATION for the screen it's linked to (you will need an outer join to include the TRS reports as they aren't linked to screens)
  3. SEC_APPLICATION- has APPLICATION_DESCR as the short name of the report

My report shows the application, name, report type, help text, and the screen it's linked to.


Applies to: TIMSS6

Thursday, February 02, 2006

TIMSS 6: Print Label Button

On the Address and Demographic screens in TIMSS 6 there is a Print Label button. This can be used to print a single label for a customer. Ideally you would have a single label printer like one of the DYMO Lablewriters.

This button actually launches a Crystal Report. It's one that is downloaded to the local machine, but it can be found at

..\TPRO\WebDeploy\Env1\TimssUIReport\cus500_1up.rpt

You can modify this Crystal Report to print a single label for whatever printer your organization is using. You will need to have the printer installed on the machine you are using to edit the report so you can shoose that printer and setup the page correctly.

Once you have updated that report on the server, you will need to restart the listener service so that it will be copied down the the local machines the next time they launch TIMSS.

When you click on the Print Label button, the Crystal Report will run and when you click on the print button. You will select the label printer that is attached to the local machine as the printer (not usually the default).


Applies to: TIMSS6