Rob's TIMSS Blog

My discoveries and ramblings of TIMSS/Personify.

Monday, May 04, 2009

Moving...

I am moving my blog. We have created a social site for TAUG that I have moved my posts to and new posts will be made there.

http://tmar.higherlogic.com/

Your login is using our Single Sign-on and should be the same as you would have used to register for TAUG.

Come on over and setup your profile and create your own Personify Blog!

Applies to: TIMSS5 TIMSS6 & Personify

Wednesday, December 17, 2008

Personify Hot Keys

Yes Virginia, there are hot keys in Personify.
  • F9 – Opens Audit Info screen
  • Ctrl+S – Save
  • Ctrl+F – Takes to Search screen with the results that are already available
  • Ctrl+R – Takes to Search screen after clearing the results and the filters that were applied earlier
  • F5 – Refresh
  • F1 – Accesses the context-sensitive online help

Applies to: Personify


Friday, December 05, 2008

TIMSS 6: QAS Address Validation

Looks like there is another TIMSS blogger out there. Nice job Flavio!

How to Enable QAS Address Validation with TIMSS

Applies to: TIMSS 6

Wednesday, November 12, 2008

Notification with Calendar Attachement

So you are sending an order confirmation to your meeting attendees when they register (using Personify's Notification Services) and you want to attach an Outlook ICS file to put the meeting in their Outlook Calendar. All you need to do is have a notification event for that meeting and attach the ICS file to the notification email.

An ICS file is a simple file defining you event. Details can be found here: http://en.wikipedia.org/wiki/ICalendar.

Create you event on your calendar, then click on Actions, Forward as iCalendar. The file in the email is an ICS file that you can attach to your notification emails.

If you open the ICS file in NotePad it will look something like this:

BEGIN:VCALENDAR
PRODID:-//Microsoft Corporation//Outlook 11.0 MIMEDIR//EN
VERSION:2.0
METHOD:REQUEST
BEGIN:VEVENT
DTSTART:20081112T140000Z
DTEND:20081114T210000Z
LOCATION:Somewhere Sunny
TRANSP:OPAQUE
SEQUENCE:0
X-MICROSOFT-DISALLOW-COUNTER:TRUE
UID:040000008200E00074C5B7101A82E008000000008014BB16AD44C9010000000000000000100
000002EA11601D9E28D4A9CEE04CA5EDE5162
DTSTAMP:20081112T151124Z
DESCRIPTION:Here are the details of my Annual Meeting\n
SUMMARY:Annual Meeting
PRIORITY:5
X-MICROSOFT-CDO-IMPORTANCE:1
CLASS:PUBLIC
END:VEVENT
END:VCALENDAR

Not to complex.

Applies to: Personify

Tuesday, November 04, 2008

The Personify OPEN Summit

So have you been wondering what I've been doing since joining TMA Resources? Well now is your chance to see: come to the Personify Open Summit, December 1st & 2nd in Washington, DC at the Ronald Reagan Building & International Trade Center.

If you were at the ASAE annual meeting in San Diego back in August, you saw the launch of Personify Open, which promoted the open API model, the Personify platform, and our partners who are integrating their products with Personify. The Personify Open Summit takes things a step further by providing association professionals the opportunity to learn how the open API model is revolutionizing the way associations conduct business.

Keynote speaker JP Morgenthal, tech evangelist and emerging technologies thought leader, will kick off the Open Summit with a presentation on the value of the open API model and how this model is revolutionizing the way associations conduct business.

Then several TMA Resources’ solutions partners will demonstrate how they have used this model to build out-of-the-box integrations between their products and Personify. As the Partnership Manager, my job is to get partners to build standard out-of-the-box integrations with Personify. We will have partners show their integrations with content management systems, email marketing, exhibition management, social neworking applications, and online customer support.

The second day of the Personify Open Summit is designed for developers and those interested in getting into the nuts and bolts of the Personify platform. Similar to the Developer Day held at the TAUG conference in Louisville, this course will provide a hands-on, in-depth technical tour of Personify. There will be intro and advanced tracks.

You can register for just the first day or for both. Learn more at http://www.tmaresources.com/opensummit.

Hope to see you there!

Applies to: Personify

Wednesday, October 08, 2008

Personify: Spell checking a Text Box

So you have added a text box to a form in Personify so your users can type in a paragraph about something or other. Wouldn't it be great if you could spell check what they have entered?

Well you can.


Put a button on the form and for the command use:

cmd://Form/DoSpellCheck?ControlName=name of your control

so if you added a text box called txtCompDescr, the command would be:

cmd://Form/DoSpellCheck?ControlName=txtCompDescr

This opens a dialog box that spell checks the data in the control.


Applies to: Personify

Tuesday, September 23, 2008

Running Personify on a Mac

Can you run Personify on Mac OS X? Nope. That's usually not a problem as the people who use Macs at an association usually don't need access to the AMS.

However, if you really need to have Personify (or TIMSS) on a Mac, there is a program for you can buy that allows you to run Windows applications on a Mac called Parallels Desktop for Mac: http://www.parallels.com/ .

You don't even have to reboot your machine as it runs in "parallel". And since it is an actual install of Windows and not just an emulation, it works just like the real thing. For $80, it a bargain.

Applies to: TIMSS5, TIMSS6, & Personify

Wednesday, September 10, 2008

Personify: Passing info to a Web browser URL

One of the things I like to show off with the Partner integrations in Personify is pulling up a customer in Personify and having a tab that has a Web browser window which pulls up that customer's information in the partner application.


This is done by simply creating a tab with a Web Browser control on it. The key is in the Code behind the screen and when calling the Open method with the the master customer id added to the URL.

WebBrowser1.Open(String.Concat("http://tma.higherlogic.com/Personify.aspx?MasterCustomerId=", Context.MasterCustomerId, "&SubCustomerId=", Context.SubCustomerId))


So this will open a tab with the current customer's information. VERY COOL!

Obviously the URL you are calling will need to know what to do with the master customer id to pull display their informaiton. You will also want include code to refresh the browser window when you change customers.

Applies to: Personify

Friday, May 09, 2008

VeriSign --> PayPal

In 2005, PayPal acquired VeriSign’s payment gateway product Payflow Pro, which is integrated into TIMSS and Personify. As a part of the re-branding from VeriSign to PayPal they are updating their host URLs

- The new pilot host URL is: pilot-payflowpro.paypal.com
- The new production host URL is: payflowpro.paypal.com

The verisign.com host URLs are still available and will be until 2010. However, they suggest that you update your application(s) to the new paypal.com domain host URLs at your earliest convenience.

Applies to: TIMSS6 & Personify

Wednesday, March 26, 2008

Personify Idea Manager

On many of the screens in Personify you will see a light bulb at the top right with the Search, Save, & Refresh buttons.


This icon is for the Personify Idea Manager. All it does is allow users to send emails to a specific address. If your users are working on a screen and have an idea, they can click on the light bulb to send an email. The To: address is controlled by a system parameter: IDEA_MANAGER_DEST_ADDRESS.

TMA Resources uses it internally for ideas related to Personify, however you could obviously reuse it for something else, setting the email address to one that would is more meaningful for you.


Applies to: Personify

Wednesday, March 12, 2008

CUS_DUP_MERGE_TABLE

When merging 2 customer records, TIMSS 6 & Personify use a lookup table to see which columns in which tables should be moved to the retained customer: CUS_DUP_MERGE_TABLE & CUS_DUP_MERGE_COLUMN.

There have been a couple postings on the Yahoo Group about tables not being merged. For them to be merged the table and associated column must be in these tables with the appropriate action (MERGE/DELETE).

To see what tables are missing, I wrote the following query:

select c.table_name, c.column_name
from INFORMATION_SCHEMA.COLUMNS c, INFORMATION_SCHEMA.TABLES t
where c.DOMAIN_NAME='CUSTOMER_ID' -- user defined data type
and c.table_name=t.table_name
and t.table_type='BASE TABLE'
and not exists (select 1 from dbo.CUS_DUP_MERGE_TABLE d
where d.table_name=c.table_name)
order by c.table_name, c.column_name

This looks for tables in the database schema that have a column with a type of CUSTOMER_ID that are not in the CUS_DUP_MERGE_TABLE table.

If the table (and column) is missing, then the table will not be merged. If it's a table added by you, or one that was added by TMAR but was not added for some reason in an upgrade, it needs to be added for the merge to work correctly.

This will return a lot of temporary tables. Including all those tables will impact performance of the merge process, so I would only add the ones that you really need to be there. For example, if you use the ORD660_Processed table to generate a letter using a Crystal Report and need that data to remain consistent after records are merged, add it.

Applies to: TIMSS6 & Personify

Monday, February 18, 2008

Meeting Packages

When we setup the TAUG08 meeting product, we wanted to automatically include some sessions on the order like the Welcome Reception, Ask TMA Resources, A Night at the Races, etc. To do this, we created a package with all the sessions we wanted to include on the order.

Then we included the package on the rate codes for the meeting.

And since it's done for the rate code, different components can be added depending on the rate you get. So members (who get the Member rate) can get one package of included sessions, and non-members (who get the List rate) can get a different package.

Applies to: TIMSS6 & Personify

Friday, February 08, 2008

Personify Enhancements

Now that I'm on the "inside" I can tell you a bit about how product marketing works to get new features into the product. If you have heard of Pragmatic Marketing, that is the methodology we are following.

We are using a product called FeaturePlan to collect data about what should go into the product. Enhancement requests that are submitted though the customer service portal, items you tell your PM about, things our sales people hear from prospects, market reserach and competitive analysis are all entered in and linked to problem statements. Problem statements receive a score based on all those inputs.

Problems statments that have high scores then get requriements gathered by product marketing, and designs are created from these requirements to go into the product.

How can you help? Tell us what you want.

Not only by submitting enhancement requests, but also volunteering for customer reserach. In many cases we will send questions to the Yahoo Group and/or ask for input from customer directly. Please help us make a great product.

Most recently we launched a new and improved the Notifications module for Personify. I sent an email to the Yahoo Group asking for information on notifications used and wanted. Those who responded had input into how the design was done and were invited to see a prototype and give more feedback. Then when the design was done, they were invited back to view the finished product and see if we got it right.

Applies to: Personify

Tuesday, January 22, 2008

TAUG 2008

Is it really TAUG time again? Boy time flies.

Now that I'm on the "inside" I can see this year's TAUG will be one of the best. Not only do we have some great session planned, but a lot of fun activities. TAUG is a great opportunity to learn about TIMSS & Personify, and to meet your counterparts at other organizations (putting faces to the names from the Yahoo Group).

So go to TAUGConference.com now to register. The creative people in our Marketing Department are determined to make Sean C. and myself into cartoon characters with pages like Just Ask Rob & Where in Louisville is Sean? Those pages will be updated weekly so you can have a good laugh at our expense.


You will also find information on the TAUGConference.com site about how we are trying to make TAUG green. You may have seen the post from Lauren R. that we will buy a lunch for those who decide to drive to TAUG instead of fly.

Applies to: TIMSS5, TIMSS6, Personify

Monday, December 24, 2007

TIMSS 6: Adding views to the Search Screen

In TIMSS 6, you can add views to the APPQUERYSEARCH screen. First create the views you want to search with. Make sure the view includes the MASTER_CUSTOMER_ID and SUB_CUSTOMER_ID.

Next use Extender to add to the OnOpening event of the screen you want to add the view to the search. If that's CUS001, then the code would look like this:

Public Sub CUS001C_OnOpening ( ByRef MyForm As Object)

MyForm.SearchViewNames =
“Cus_Address_Alias_C_VW,Cus_OSR_Relationships_VW,

Cus_ISR_Relationships_VW,Cus_Proj_Mgr_Relationships_VW”

End Sub


Applies to: TIMSS6

Thursday, December 13, 2007

Google Maps

So you've added a Google search button to a screen to search for a customer. Want to get launch Google Maps from within TIMSS/Personify? Do the same thing (launch a browser window) only pass the address in the URL string.

http://maps.google.com/maps?f=q&hl=en&q=1919+gallows+rd+22182

The information in the URL above after "q=" is the address we are querying on with pluses instead of spaces.

Want directions? Then you’d use the start address (SADDR) and destination address (DADDR) to pass both addresses.

http://maps.google.com/maps?f=d&hl=en
&saddr=1919+gallows+rd+22182
&daddr=1600+Pennsylvania+Ave+NW+20006

Applies to: TIMSS6 & Personify

Monday, December 03, 2007

Logging TCMS Users

This one comes from my replacement at COF: Russ, but I've heard requests for this functionality at TAUG.

So you want to track customer logins to TCMS, but the only information stored in the WEB_USER table is their last login. If you put a trigger on that table to populate a log table (or even CUS_ACTIVITY) every time the last login time changes, you've done it as this field is updated every time the customer logs in.

Not only can you track the logins, but using the same methodology you can track changes to user names and passwords also stored in that table. You can also track the MODOPER to see who made the change: the customer or a staff member.

Applies to: TIMSS6 & Personify

Wednesday, November 28, 2007

Min & Max Adjusted Price

When setting up a product's pricing, you may have noticed fields for the Minimum & Maximum Adjusted Price. These fields are used in conjunction with the Short Pay code.


When the Short Pay code is REJECT, you can't edit the field, but BOTH the Min and Max are set to the full price of the product. Thus for the order line to be Active, the full price has to be paid.

When the Short Pay code is AR, you can't edit the field, but the Max is set to the full price of the product and the Min is set to zero. Thus for the order line to be Active, anything can be paid, and the remainder is a receivable on the order.

When the Short Pay code is ADJUST, you CAN edit the field. The Max is the largest amount that the price will be adjusted up to on an order. For example if the price is $100 and the Max is $200 and a customer pays $150, the price of the line item will be adjusted from $100 to $150. However, if they paid $500, the price of the line item would only be adjusted to $200.

The Min is the smallest amount the price can be adjusted to for the order to be active. For example if the price is $100 and the Min is $50 and a customer pays $75, the price of the line item will be adjusted from $100 to $75. However, if they paid $25, the price would not be adjusted that low and the order would not be made Active.

Applies to: TIMSS6 & Personify

Monday, November 12, 2007

.NET WebService Studio

Looking for a good tool to call Web Services? Try the .NET WebService Studio 2.0. This tool will

...invoke webmethods interactively. The user can provide a WSDL endpoint. On clicking button Get the tool fetches the WSDL, generates .NET proxy from the WSDL and displays the list of methods available. The user can choose any method and provide the required input parameters. On clicking Invoke the SOAP request is sent to the server and the response is parsed to display the return value.

It can be found here.

Applies to: TIMSS5, TIMSS6, & Personify

Monday, November 05, 2007

Module Abbrivations

Here is a listing of the 3 letter abriviations for the diffent modules in TIMSS & Personify:

ABC - ABC Subsystem
ABS - Abstract Subsystem
ADR - Address Validation Subsystem
ADV - Advertising Subsystem
APP - Application Subsystem
AUD - Audit Logging Subsystem
BPA - BPA Subsystem
CCP - Credit Card Processing Subsystem
COM - Committee Subsystem
CPN - Coupon Subsystem
CRT - Certification
CUS - Customer Subsystem
ECD - Electronic Content Delivery
EFT - Electronic Fund Transfer
FAC - Facility Subsystem
FAR - Accounting Subsystem
FGL - Financial General Ledger
FND - Fund Raising
INV - Inventoried Products Subsystem
LCK - LockBox
MBR - Membership Subsystem
META - Application Metadata
MISC - Miscellaneous Subsytem
MKT - Marketing Subsystem
MRM - Call Center Subsystem
MTG - Meeting Subsystem
ORD - Order Entry Subsystem
PCK - Package Subsystem
SEC - Security Subsystem
SPK - Speaker Subsystem
SUB - Subscription Subsystem
TRN - Transcript
TRS - TIMSS Reporting System
UAR - Un-applied Receipt
USR - User Defined Subsystem
WEB - TIMSS Web (TIMSS e-Commerce)
XBT - Exhibition System

Applies to: TIMSS6 & Personify

Monday, October 29, 2007

Customer URL Format

In TIMSS and Personify, you can store a URL for a customer which can be up to 100 characters long (data type of EMAIL_ADDRESS).

The question often comes up if one should store the URL with the leading http:// or leave that off. I found it best to add it in, that way whenever I'm working with the URL most programs will recognize it as such and make it a link.

However, because the field only holds 100 characters and some URLs are very long, you might want to save the extra 7 characters an not include the http://.

The most important thing is that your data is consistent. If all the URLs don't have the http:// you can always add it in later when pull the data.

Also if you find yourself continuously having URLs that are too long, you can always change the data type for EMAIL_ADDRESS to be longer.

Applies to: TIMSS6 & Personify

Monday, October 22, 2007

TIMSS 6: Inactive Codes in Drop-Downs

I have heard many complaints about inactive codes being displayed in drop down boxes in TIMSS. These are displayed for 2 reasons. First, it allows you to search for codes that are inactive. Second, when an inactive code is actually used, the description will be displayed, otherwise the field would be blank.


What you can do to clean up this list is change the display order on the inactive codes. In types and codes, when you change a code to inactive, also set the display order to something like 99 so it will be displayed at the end of the listing.

Applies to: TIMSS6

Monday, October 08, 2007

Free DNN Training Videos

Personify e-Business was created using DotNetNuke (DNN) version 4. On the DNN site (http://www.dotnetnuke.com/) there are some free training videos to get you familar with the DNN product and how to work with it.

They are actually on DNN 3, but it's similar to 4.

Applies to: TIMSS6 & Personify

Monday, October 01, 2007

Search Phone

In Personify and TIMSS 6, in the CUS_COMMUNICATION table, there is a column called SEARCH_PHONE_ADDRESS. This field is the phone number with the formatting stripped out. For example,

7035645200

instead of

(703) 564-5200

In both applications you can customize search screens. You can add this field to your search screens so that your CSRs don't have to enter the formatted number when they want to search by phone number.

Applies to: TIMSS6 & Personfiy

Monday, September 24, 2007

Personify: Copying Customer Information

So you pull up a customer on the Call Center screen in Personify and you want to copy the customer ID to the clipboard so you can paste it somewhere. You can't highlight it so what do you do?

If you right click on the customer ID, a little menu pops up with one option: Copy. This copies it to the clipboard so you can paste it.

This also works on the Address and Phone information on the screen.

Applies to: Personify

Monday, September 17, 2007

Name Prefix, Suffix & Credential

In TIMSS 6 and Personify, an individual's name is made up of different parts, including Prefix, Suffix & Credential fields that are based on types and codes. The types are NAME_PREFIX, NAME_SUFFIX, CREDENTIALS, respectively. You CAN use periods in the code.

The prefix and suffix are selected from a drop down on the customer name screen. There are options in the System Parameters (USE_PREFIX_DESCR_LBL & USE_SUFFIX_DESCR_LBL) to determine if the code or it's description should be used in the label name.

For credentials, there is a look up on the customer name screen because you can select more than one credential (use the crtl key to select more than one). The code is used in the label name, and the description is shown to define the credential (i.e. CPA=Certified Public Accountant).

As on all codes, you can set a Display Order to control how these are displayed. You can use this to display the codes with common values first or in a logical order (Jr, Sr, III, IV, etc). If you have a long list of codes, it's probably best to display them alphabetically so your users can easily find what they are looking for.

Applies to: TIMSS6 & Personify

Monday, September 10, 2007

Personify: Web Services

Personify comes with 2 types of Web services: Universal Web services & Simple Web services.

The Universal Web service essentially wraps the Personify API for Web Service access. You can do just about anything with the Universal Web service, but it may take some knowledge of the Personify application. The Universal Web service is the most flexible approach but also the most complex. In general, it will return whatever you are looking for (including extender fields) but will return a lot of things you probably aren't looking for.

The Simple Web service is designed to do one thing simply. These Web services have simple parameters and simple return values. They are straight forward and easy to use but can’t do everything. The list of available Simple Web services will grow over time based on market research.

Applies to: Personify

Monday, September 03, 2007

Data Integrity: Gender & Prefix

One script that I ran on a regular basis had to do with a individual's gender and prefix. In general, they should agree and when they don't, something is wrong.

select master_customer_id, label_name, gender_code, name_prefix, formal_salutation, nickname
from customer
where customer_status_code='ACTIVE'
and ((gender_code='M' and name_prefix in ('Ms.','Mrs.','Miss'))
or (gender_code='F' and name_prefix in ('Mr.')))


If I had them all agreeing and then one day there were some that didn't agree it would mean that either someone had just created the record and entered one wrong or someone had changed the name of the customer (instead of creating a new customer record) and changed one but not the other.

Some further updates I did with these fields would be populating null values, for example if the prefix was Mr. then the gender is M.

update customer set gender_code='F'
where record_type='I'
and gender_code is null
and customer_status_code='ACTIVE'
and name_prefix in ('Ms.','Miss','Mrs.')

update customer set gender_code='M'
where record_type='I'
and gender_code is null
and customer_status_code='ACTIVE'
and name_prefix in ('Mr.')


You could also do the opposite, updating the prefix (and label name, search name, formal salutation, etc.) when the gender is known but the prefix is missing.

Applies to: TIMSS5, TIMSS6, & Personify

Monday, August 20, 2007

PCI Compliance

Are TIMSS and Personify PCI compliant? That's not the right question. What you should be asking is if you, as a merchant, are PCI compliant.

Much of the Payment Card Industry Data Security Standard (PCI DSS) requirements focus on the security of your network, and having your customer's information protected from external and internal hacks.

Credit card numbers are stored encrypted in TIMSS and Personify, and future version may not even store credit card numbers. But if you have faxed in order forms laying around the office with credit card numbers on them, then you have a problem and no software can protect you.

Here are some links so you can find out more and what you need to do:
https://www.pcisecuritystandards.org/
http://www.pcicomplianceguide.org/
http://usa.visa.com/merchants/risk_management/cisp.html?ep=v_sym_cisp
http://www.owasp.org/

Applies to: TIMSS5, TIMSS6, & Personify

Tuesday, August 07, 2007

Personify: Debug Tracer

Any of you who have been using TIMSS for a long time will remember (and may still use) the router32.log file which captured all of the SQL statements that were executed by the TIMSS 4.x & 5.x applications. The purpose of this log was to capture what was happening when an error occurred. But the real value I found was learning what pieces of data were stored where by reviewing these SQL statements. It not only helped me understand what was going on, but also where data was stored when I needed to report on it.

So in Personify, one of the Debug tools is the Debug Tracer (under Tools, Debug, Debug Tracer). This opens a window that logs the commands and SQL statements that are executed by Personify. Very cool. Normally it's not running to improve performance, but you can turn it on to see whats happening on a particular screen.


Applies: to Personify

Monday, July 30, 2007

TIMSS 6: Personalized Standard Letters

In TIMSS 6, you can create standard letters to be used under Contact Tracking. What you might not know is that you can setup Word documents to have merge fields in them so that you can have that standard letter personalized for a customer.

First you will need to create a template Word document. The standard letters use the CUS_PRIMARY_INFO_VW to pull data into the document, so you need to create a document with fields based on this view.

  1. Open APP100, Ad-Hoc QueriesClick on the ‘Build New Queries’ tab

  2. Highlight the view ‘CUS_PRIMARY_INFO_VW’

  3. Within the pane, ‘Fields to Display’ reflect the appropriate fields from the ‘Fields Available’ pane that are within the Word document you will be using.

  4. Click on the ‘Run Query’ button

  5. Enter a valid value within any of the search fields and click on the ‘Query’ button

  6. Once data is displayed within the ‘Search Results’ pane, click on the ‘WordMerge’ button

  7. When asked if you want to open an existing document, choose NO

  8. Create your document, inserting the appropriate Merge fields and save it.

Next setup the Standard Letter with the Word Document.


  1. Open MRM004, Standard Letter Setup

  2. Click on the appropriate Letter Type and click on the “Add Document” button

  3. Select the appropriate word document (the one you just created)

  4. Enter an ID in the field labeled “ID” – this is a user-defined value

  5. Confirm that the correct Application is reflected (if you don’t see the correct application listed within the drop-down options, go to System Types & Codes, Type = APPLICATION_TYPE and add “MSWORD” as a Code value. You’ll need to reopen MRM004 to see this newly added Code.)

  6. Confirm that the correct Letter Type is reflected

  7. Within the field “View Name” select the row labeled “Customer Primary Information”

  8. Confirm that the file name is correctly reflected

  9. Enter an appropriate description of the document/its usage in the field labeled “Description”

  10. Enable the “Personalized” check box

  11. Hit Save to upload the document

Now you are ready to go! Open Contact tracking, pull up a customer, and create an inquiry. When it's created, you can choose the standard letter you just created (the ID from step 13 above is what's displayed), then click on the Open button. This will open Word with your letter and the merge fields. In Word, click on the View Merged Data button and you will see your personalized letter.

Applies to: TIMSS6

Monday, July 23, 2007

TIMSS 6: Active Customer Statuses

Starting in TIMSS 6.2.2, you can have multiple customer status codes that are active. Previously, there was only one active status: ACTIVE.

In System Types and Codes, the CUSTOMER_STATUS code is determined to be active based on option 2. Those that are active have ACTIVE in option 2. Those that are not active should have an option 2 of INACTIVE.

Now you can add your own statuses, like PROSPECT or VIP, to help distinguish certain types of customers. Please note that if you take advantage of this you will need to update any custom process and reports that you've created to also check the option 2 value of the CUSTOMER_STATUS to make sure you are pulling the active statuses.

Similarly, option 3 of the CUSTOMER_STATUS controls if customers with this status can place an order with a value of Y or N. This will default the Can Place Order flag on the customer record when the customer is created or when the customer's status is changed.

Applies to: TIMSS 6

Monday, July 16, 2007

TIMSS 6: Highlighting Data Behind a Button

If you have created a button with that opens a window, wouldn't it be nice to tell your user if there was data behind the button without clicking on it? You can through extender. When you load the screen, check to see if there is data behind the button. If there is, change it's attibutes to highlight the fact that there is data behind it. For example, if you had a button that opened a comments screen that had data stored in a table you created, in the appropriate event put:

strSQL = "Select * from USR_CUS_COMMENTS where master_customer_id='" & oMaster.Text & "' and Sub_customer_id=" & CInt(oSub.Text)

oRecDS = MyForm.ScriptingGetDataSetWithSQL(strSQL, "USR_CUS_COMMENTS")

If Not oRecDS is nothing Then
If oRecDS.Tables(0).Rows.Count > 0 Then

oButton.ForeColor = System.Drawing.Color.Red
Else
oButton.ForeColor = System.Drawing.Color.Black
End If
End If


Applies to: TIMSS6

Monday, July 09, 2007

TIMSS 6: Call Center User Areas

We had an issue where a product's orders weren't showing up on the Active Orders user area on the call center. Turns out the meeting date was incorrect and in the past so it didn't show up.


You hopefully know that each user can pick what is displayed in these three areas on the User Preferences screen (SEC001A):

ACTIVEORDERS- Display Active (Paid) Orders Info
ACTIVITY- Display Customer Activity Info
COMMITTEEMEMBERSHIP- Display Committee Membership
CONTACT- Display Contact Tracking Info
CURRENTMKTCODE- Display Current Market Codes Info
MEMBERSHIP- Display Membership Info
OPENORDERS- Display Open (Un-Paid) Orders Info
RELATIONSHIP- Display Customer Relationships
SEARCHRESULTS- Display tree of search results (all the customers returned from query search)
USEURL- Use a customer supplied URL

Much of the call center user area data is retrieved using the MRM001_CustInfo_SP stored procedure. Looking at this code, you can see how the data is returned and what table/view TIMSS is looking at to populate these areas.

Please note that if you make changes to base stored procedures or views, TMAR may overwrite them when you upgrade.

Applies to: TIMSS6

Monday, July 02, 2007

Changing Teams

I've gone to the other side.... I left COF and I'm now working for TMA Resources.

I wanted to get out of COF and Edi was nice enough to give me a job. I'm working for Paul Gannon in Marketing as the Partnership Manager. That role will have me working with partner companies like Syscom Services and Boxwood Technology, helping them work with TMAR and integrate with Personify.

One of the goals is to come up with a standard toolbox for partners to use in their integrations with Personify. I'll need to talk to not only these partner companies, but TMAR clients and others outside of the family to see what should be included in the toolbox.

Wish me luck, and I might be calling you asking what you think we might want to include.

And yes, I plan to continue blogging about TIMSS & Personify.

Monday, June 25, 2007

TIMSS 6: Base Crystal Report Naming

There are a ton of Crystal Reports that come with TIMSS 6. Several of them are similar and are classified/named in a particular fashion.

This first distinctions are for Trade Associations and Professional Societies. Trade Association version will have a C after the report number (for company), whereas reports for Professional Societies will have a P. C reports will focused on companies, and P reports will focus on individuals. Both will be sorted/grouped appropriately.

The second distinctions are for Internal (I) and External (E) version of the report. Internal versions are meant for internal use only. External versions are for distribution outside of your association and not all customer data is to be shared outside. Thus the external version should check the Publish flag on communications (i.e. phone/email) and the Confidential flag on addresses:

CUS_COMMUNICATION.PUBLISH_FLAG='Y'

CUS_ADDRESS_DETAIL.CONFIDENTIAL_FLAG='N'

In general, reports for orders are considered internal and directories are external.

Applies to: TIMSS6

Monday, June 18, 2007

TIMSS 6: More Ad-Hoc Query Security

It was pointed out to me that there is another way to add security to Ad-Hoc Queries. On the META001 screen where one sets up views for use with ad-hoc queries, there is an Available for Public check box. If you un-check this box, the Special Security button is activated, and you can select groups that can use this view for queries.

When a user goes to Ad-Hoc Queries they will only see queries that use views that they have access too. This is different from my previous post that puts security on the reporting category in Ad-Hoc Queries.

Applies to: TIMSS6

Monday, June 11, 2007

TIMSS 6: The Magic of CUS500

The CUS500 TRS report can be used to print a variety of labels. In System Types & Codes, there is a type for LABEL_FORMAT with codes corresponding to the various labels available. These correspond to Crystal Reports on your TRS. So if you run the report with the AVERY5160 label format parameter, the process will run the CUSLABEL_AVERY5160.rpt report on your TRS. If you don't like the layout of the labels or the font, that's the report you'd update.

And if you wanted to add a new label format for name badges or tent cards, just add the appropriate code and the corresponding Crystal Report to your TRS.

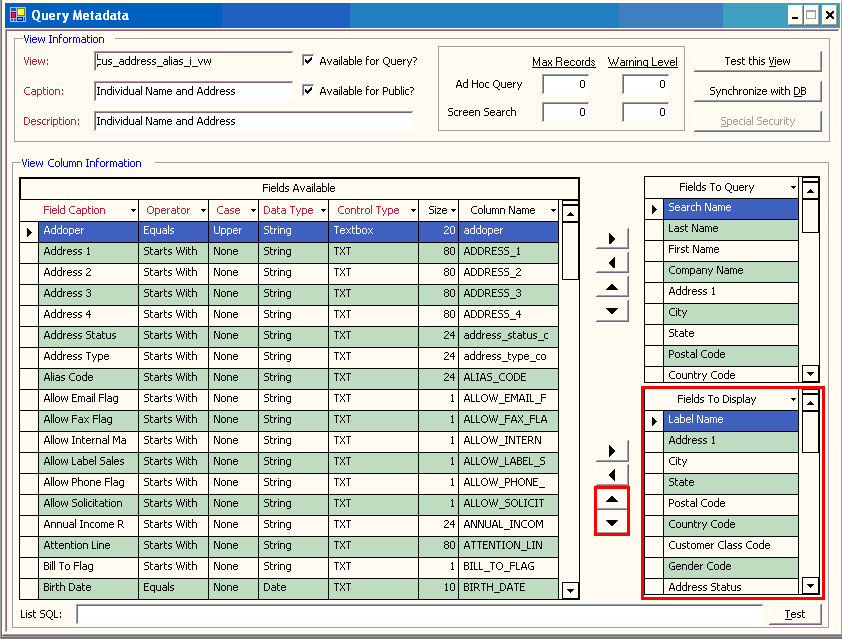
You can also pull all kinds of data into this report. It is based on the CUS500_VW so you can use the filter on the Advanced Job Parameters tab to select any customers you want: in a given state, or participants in a meeting, or committee members (the latter two would have an exists in the filter query and can have addresses other than their primary; see below).

There are 3 parameters for this report: Label Format- the layout of the report from code described above; Sort Order- to sort the report based on a field; Select Primary Address Only- Y for only their primary address, N to print all their addresses (for committee or ship to addresses other than primary, you'd choose N and then filter with exists to select the correct address).

You will probably want to have 2 runs for your labels: one that pulls GOOD addresses, and one that pulls BAD address so you can see who won't be getting your mailing.

Applies to: TIMSS6

Monday, June 04, 2007

TIMSS 6: Add Application Parameters

Have you created any custom processes that could use a system wide parameter? If so you can add it to the Application Parameters and have your process look up the value.

Just pull up the screen (APP008) and hit the plus to add a parameter. You probobaly want to put it under the USR-User Defined Subsystem so TMAR knows it's yours.


This data is kept in the APP_PARAMETER table. So in your process, query that table for the value of your parameter. This will allow users to change the parameter (if you give them permission) without re-writing your process, plus you can re-use the parameter in other processes.

Applies to: TIMSS6 & Personify

Monday, May 28, 2007

ISBN-10 to ISBN-13

The International Standard Book Number (ISBN) is used as a unique identifier for books. It is not only used to distinguish different titles, but different version of the same book (for more information see the ISBN User's Guide). Starting January 1st, 2007, the number was increased from 10 to 13 digits.

The ISBN-13 can be calculated from the ISBN-10. First, the numbers 978 are put in front of the ISBN-10. The last number of both ISBN-10 & ISBN-13 is a check digit (used to validate the previous numbers) . So the check digit is dropped from the ISBN-10 and a new one is calculated for the ISBN-13.

ISBN-10: 0-060541-71-7
ISBN-13: 978-0-060541-71-2

There are several sites on the web that will do this conversion:

http://www.isbn-international.org/converter/converter.html
http://custompcsoftware.com/isbn13.html

In TIMSS there is one field for ISBN and it will hold 20 characters, so the new size is not an issue. The issue is if you want to maintain both numbers in your database.

I've chosen to just convert all my ISBN number to 13 since we don't deal with them that much and you can find the ISBN-10 based on the ISBN13. If you want to maintain both you can add an extender field, or you could create a view that calls a function that converts one to the other. It's really up to you.

I have created an SQL function to convert 10 to 13 and it's shown below:

CREATE Function dbo.ISBN10TO13(@ISBN10 as varchar(20))
Returns varchar(20) as

Begin
declare @ISBNO varchar(20)
Declare @NewISBN varchar(12)
Declare @ISBN13 varchar(20)
Declare @ISBN13F varchar(20)
Declare @i integer
Declare @n integer
Declare @v integer

--remove any hyphens or spaces
Set @ISBNO=replace(replace(@ISBN10,'-',''),' ','')

If len(@ISBNO)=10 --correct length
Begin
Set @NewISBN = '978' + SubString(@ISBNO, 1, 9)
Set @n = 0
Set @i = 1

While @i<=12 Begin Set @v = SubString(@NewISBN, @i, 1) If @i%2 = 0 Begin Set @n = @n + 3 * @v End Else Begin Set @n = @n + @v End Set @i = @i + 1 End Set @n = @n%10 If @n<>0
Begin
Set @n = 10 - @n
End

Set @ISBN13= @NewISBN+str(@n,1)
-- add hyphens
Set @ISBN13F= substring(@ISBN13,1,3)+'-'+substring(@ISBN13,4,1)+'-' +substring(@ISBN13,5,6)+'-'+substring(@ISBN13,11,2)+'-'+substring(@ISBN13,13,1)
End

Else -- wrong length, return same value
Begin
Set @ISBN13F=@ISBN10
End

Return @ISBN13F
End

Applies to: TIMSS5, TIMSS6, Personify

Monday, May 21, 2007

TIMSS 6: Ad-Hoc Query Security

Another good idea I saw at TAUG was adding security to your Ad-Hoc Query categories. I don't necessarily want to keep people from running a particular query, but I want to limit their choices so they can easily find what they are looking for.

Similarly to the Call Topic Security you can setup security on the Ad-Hoc Query Report Categories. In Types and Codes for QUERY_CATEGORY, un-check the Public Code flag and save. This will activate the Special Security button where you can pick the groups that have access to this Query Category.


Thanks to Pam R. who mentioned this in her TAUG presentation.

Applies to TIMSS6

Monday, May 14, 2007

Crystal Reports: Sorting Parameter

I have a couple Crystal reports that I've added a parameter to that allows the report to be sorted different ways. For example, our meeting function sheets can either be sorted by room or by date. To do this in the same report, I created a parameter called SortBy that is either DATE or ROOM (see Online Report Parameter Pick List to see how to pick parameters for your online report).

Then I added a formula field to the report that creates a value to sort on based on the parameter value:

If {?SortBy}='DATE' then ToText({Command.start_date})
else
If {?SortBy}='ROOM' then ToText({Command.facility_room_id})


and I use this value to sort my report.

I've done something similar with my committee roster. One group wants their committee sorted one way, and the rest a different way. So I created a parameter and a formula that generates the value to sort by:

if {?Format}='NORMAL' then
if ({COM_COMMITTEE_MEMBER.VOTING_STATUS_CODE}= 'NON_VOTING' and {COM_COMMITTEE_MEMBER.POSITION_CODE}= 'STAFF') then 99 else
if {COM_COMMITTEE_MEMBER.VOTING_STATUS_CODE}= 'NON_VOTING' then 11 else
if {COM_COMMITTEE_MEMBER.POSITION_CODE}= 'CHAIR' then 1 else
if {COM_COMMITTEE_MEMBER.POSITION_CODE}= 'VCHAIR' then 2 else
if {COM_COMMITTEE_MEMBER.POSITION_CODE}= 'SEC' then 3 else
if {COM_COMMITTEE_MEMBER.POSITION_CODE}= 'TREAS' then 4 else
if {COM_COMMITTEE_MEMBER.POSITION_CODE}= 'EXOFF' then 5 else
if {COM_COMMITTEE_MEMBER.POSITION_CODE}= 'MEMBER' then 10
else 9
else if {?Format}='CFLT' then
if {COM_COMMITTEE_MEMBER.POSITION_CODE}= 'CHAIR' then 1 else 9

Thanks to Edward B. for the hint at TAUG.

Applies to: TIMSS6 & Personify

Monday, May 07, 2007

Spamming with Outlook

If you organization is like mine, you love to spam your members.

All kidding aside, one of the features with Outlook 2003 was that pesky dialog box that pops up every time you send a message using a mail merge or a Cognos Script. There is a way you can turn this off!

This Microsoft white paper has a section on Customizing Outlook Security Settings. You'll need to make a change to the exchange server, and update the registry on the local machine. It's well worth it when you are emailing a couple thousand renewal notices and don't have to click OK every 5 seconds to send each message.

Applies to TIMSS5, TIMSS6, Personify

Monday, April 30, 2007

TAUG 2007 wrap-up

Well another TAUG has come and gone. It was great to see you all, and now I've got some new tips for my blog! There were lots of good sessions and thanks to all of you who participated.

Next year's TAUG (or will it be PAUG) will be held in Louisville, Kentucky. Paul G told me that we will be right next to Fourth street which looks pretty cool:

http://www.iglou.com/restaurants/4sl.shtml

I should caution you that many of these places are open until 4 am!

And not to mention an evening event at Churchill Downs.

I hope to see you all there!

Applies to: TIMSS5, TIMSS6, Personify

Monday, April 16, 2007

TIMSS 6: Held Line Status Code

The other day I received an email from a member in response to the web order confirmation that we automatically send when some one orders from our website. She was wondering why she had received the email confirmation since she had not ordered any books.

I sent her the ship address for the order (which wasn't her) and asked her if maybe that person had logged in as her and ordered books.

In the mean time, what do I with this order? I didn't want to fulfill it since it might not be legitimate, but I didn't want to cancel and refund since it might be valid.

So I changed the line status to Held (not the fulfill status). This way the order is still in the system, but won't get picked up by the fulfillment process.

When the member confirmed that her co-worker had used her account to order books, I changed the line status back to Active, and the order got picked up the next time the fulfillment process was done.

Applies: to TIMSS6 & Personify

Monday, April 09, 2007

Market, List & Key Codes

So what's the difference between a market code, a list code, and a key code?

A marketing code is associated with a particular marketing piece, for example a conference brochure or a pre-recorded phone call.

A list code would be a particular group of customers to which you send marketing materials.

A key code is a combination market and list codes for a particular effort.

Let's say I have a postcard that I want to sent out to promote my annual meeting. That piece would have a particular marketing code associated with it. In TIMSS, I create several lists: purchased prospects, members, previous attendees who aren't members, etc. , and I send them each this post card.

When I use Marketing Production Control in TIMSS, I will create different efforts for this post card to go to each one of those groups, and each would have a different key code.

Or I can have different marketing pieces (a postcard and a brochure) go to the same groups to see who responds best to different efforts.

The combination of marketing & list codes is a key code, so that when an order is entered, entering a key code is the same a entering both a list and a market code. Thus the key code is what should be printed on the piece and communicated to the CSR when the order is taken.

You might want to name them consistently, for example, key codes always start with the letter K, so that the CSR knows it's a key code.

Applies to TIMSS5, TIMSS6, & Personify

Monday, April 02, 2007

Credit Cards

Here are a couple articles I found about credit cards that you might find interesting.

How Credit Cards Work- gives a history of credit cards as well as how they work with the bank.

Anatomy of Credit Card Numbers- tells how the actual credit card number is made and how you can tell if a number is valid.

Credit Card Magic- more about card numbers.

Card Security Code- Info about the CVV2

Applies to: TIMSS5, TIMSS6, Personify

Monday, March 26, 2007

Emailing Web Order Confirmations

You might remember a thread on the listserv a few months ago regarding emailing confirmations to customers for their orders. TIMSS6 has this as base function, however I didn't like the fact that is sends confirmation for all orders when I just wanted to send them for orders that came in through the web (customers expect this).

I found an article on how to send email from SQL Server using xp_smtp_sendmail. Following the steps in the article, I created a stored procedure in my database that emails confirmations for orders with a method of WEB. Then I used the SQL Server Agent to schedule a task to execute that procedure every couple minutes.

The xp_smtp_sendmail has a couple nice features, including changing who the email is from and allowing an HTML message.

I also added a table to the TIMSS database to store the messages that were sent.

Applies to: TIMSS5, TIMSS6, Personify

Monday, March 19, 2007

TAUG 2007

Yes it's TAUG time again. This year the TMA Resources Annual Users Group (TAUG) meeting is in Albuquerque, April 22-25. I'm on the Program Committee and I'm really looking forward to this year.

The sessions are categorized by personas. If you've been to the registration site (http://www.taugconference.com/) you will see the different personas that the sessions are aimed atWhat's so great about TAUG? Here's a short list:

1. Great educational content
2. Networking with your counterparts that also use TIMSS
3. Free time with your Project Manager
4. Meet your TIMSSCare Rep.
5. See what other people are doing with TIMSS that you should be doing.
6. Get a look at Personify
7. Put a face to a helpful name from the listserv

This is my 7th TAUG (oh my God!) and I still get lots of good information from it. Just look at my blog posts from just after TAUG a year ago. Most of them were gleaned from it.

I hope to see you there! And if you have anthing you'd like to see here, let me know.
Applies to: TIMSS5, TIMSS6, Personify

Monday, March 12, 2007

TIMSS 6: Membership Default Date Masks

When setting up a membership product, there are 2 variables that you can set to determine what the default begin and end date of the membership will be. They are set on the Membership Structure Setup screen (MBR000) and on each membership product (MBR001).

The available codes for these to variable are found in types and codes under DEF_END_MASK and DEF_START_MASK.

DEF_START_MASK:
  • BEGJAN- First of January
  • BEGFEB- First of February
  • BEGMAR- First of March
  • BEGAPR- First of April
  • BEGMAY- First of May
  • BEGJUL- First of July
  • BEGJUN- First of June
  • BEGAUG- First of August
  • BEGSEP- First of September
  • BEGOCT- First of October
  • BEGNOV- First of November
  • BEGDEC- First of December
  • BEGMY- First of the current month
  • CUTOFFMONTH- First of Next Month after cutoff days- stored in OPTION_1 of the DEF_START_MASK code
  • CUTOFFYEAR- First of Next Year after cutoff months- stored in OPTION_1 of the DEF_START_MASK code
  • NEXTMONTH- First of Next Month
  • NONE- NONE
  • TODAY- Today

DEF_END_MASK:

  • 1YEAR- One Year
  • 1YRMINUS- One Year Minus (end date is last date of previous month next year)
  • 1YRPLUS- One Year Plus (end date is last day of current month next year)
  • ENDJAN- End of January
  • ENDFEB- End of February
  • ENDMAR- End of March
  • ENDAPR- End of April
  • ENDMAY- End of May
  • ENDJUL- End of July
  • ENDJUN- End of June
  • ENDAUG- End of August
  • ENDSEP- End of September
  • ENDOCT- End of October
  • ENDNOV- End of November
  • ENDDEC- End of December

A common choice for the end date is the One Year Plus. This will give the member a few extra days of membership on their FIRST order by making the end date the last day of the month. So if they joined on 3/15/2007, their end date would be 3/31/2008, giving 12.5 months of membership.

Many organizations go with the One Year Plus so that they have a few extra days in that first year to get setup. For example if they joined at the end of the month they might miss that month's magazine, but they would still get 12 issues; if they joined early in the month, they might actually get 13 issues, but they would not get 11 issues and short change the member.

My organization is a Trade Association and our membership runs annually. Thus we use the value for End of December as our default end mask.

I would imagine that most organizations use TODAY for the start date of their new membership orders.

You should note that this really only effects new membership orders. Renewals are based on the end date of the current order and whatever length you have setup for the membership product.

Applies to: TIMSS6

Monday, March 05, 2007

TIMSS 6: Extender Textbox

This came across the listserv a couple weeks ago. It's good information and I like to put stuff up here so I know what I've done in TIMSS. All credit goes to Dave D. and Eric E.

When adding a text box to a screen, Dave wanted to have it read only with a scroll bar. Here's what he did:

Dim oTextBox as Object
try
oTextBox = MyForm.getformcontrolbyname("usr_txt11")
oTextBox.ReadOnly = "True"
oTextBox.ScrollBars=2
Catch Ex as Exception
Msgbox(ex.Tostring())
End Try

Values for scrollbars: 0=None; 1=Horizontal; 2=Vertical; 3=Both

Applies to: TIMSS6

Monday, February 26, 2007

Using a SQL statement in Crystal Reports

Have you ever had a complicated report that you just couldn't write using the "wizards" in Crystal Reports? Well you can write an SQL query and enter it directly into Crystal using a Command.

When adding tables you can add a query by clicking on Add Command.


That will open a box where you can enter a query. You can even add prompts (Parameters).


The data returned to in you Select statement is then available in your report.
Applies to TIMSS5 & TIMSS6

Monday, February 19, 2007

TCMS Meeting Registration Modification, part 3

The third customization we did to the TCMS meeting registration had to do with the Hotel reservation. As I mentioned in a previous post (TIMSS 6: Hotel Blocking for Meetings) we found that the icon for making a Hotel Reservation to be almost hidden. So we changed how the process works.

After someone clicks on the Place My Order button to purchase a meeting product, we show the hotel reservation screen (if a hotel is setup) instead of showing the confirmation screen.

We not only added ADA Accessible and Special Requests, but also Room Sharing process to this screen.


After giving hotel reservation (or skipping it) the confirmation screen is then shown with the order summary and the hotel reservation information at the bottom.

Applies to: TIMSS6

Monday, February 12, 2007

TCMS Meeting Registration Modification, part 2

Another customization we did with the TCMS meeting registration was to add a Questionnaire. This adds an extra step to the registration process where the registrant is asked questions based on the sessions they have signed up for.


This required 2 extender tables, one for the questions (USR_MTG_QUESTIONS) and one to hold the answers (USR_MTG_ANSWERS) for each order.

A new tab was added to MTG001 with a grid to enter the questions along with a sort order, answer type (check box, combo, or text field) along with choices for a combo, and if it's a required field.

A new button was added to the Meeting tab on ORD001 that opened a new screen to show the Q&A entered by the registrant through TCMS.

The questions asked are for each product in the cart, so I can ask generic questions of an attendee under the meeting product, and if I have a golf outing I can ask those who've signed up for it if they are bringing or renting clubs.

Applies: to TIMSS6

Monday, February 05, 2007

TCMS Meeting Registration Modification, part 1

We had TMAR customize the meeting registration web part. One change was how the "sessions" were displayed. We use products under the meeting for our registration rates and wanted to duplicate this in our online registration.

First, we only show the products that are web enabled under the meeting which have Include Add-to Cart Button checked.

Next they are grouped by the product class. In the example below, the class descriptions are Registration Rates, Spouse Rates, and Optional Events.


The classes are sorted by the code and my codes are 1REGREATE, 2SPOUSERATE, 3OPTENVET. When registering, at least one item from the first group must be selected.

The date/time was removed from the web part. This is so registration rates can have times that conflict with conflicting rates. For example, one can't sign up for Full Registration and Sunday Registration, so they are setup in TIMSS with conflicting times.

Finally, the Brief Description is displayed under the session name. This is where the date/time can be displayed along with any other information needed about the session.

Applies to: TIMSS6

Monday, January 29, 2007

TIMSS 6: Meeting Planning for Rooms & Requirements

For our conferences, the meeting planning staff enters rooms, configurations, and requirements for each meeting session/product as well as the responsible vendor and or staff person in TIMSS. A Crystal report is linked to the MTG001 screen to display all this information sorted by time or sorted by room.


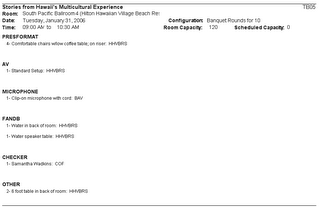
The report shows the session name, time, room, configuration, capacity, and requirements. Requirements are setup under system types and codes. Each type (ie. AV or F and B) have sub codes under each.

When these are entered for a session on MTG001, quantity and any comments can be added that also show on the report.

Applies to: TIMSS6

Monday, January 22, 2007

TIMSS 6: Relations to non-customers

In TIMSS 6 you can create a relatioinship to someone who isn't a customer. Usually you would want to create a relationship to a customer, but in some cases you might not. For example if you wanted to store the names of family members, but not enter the family as customers.

You will notice that on CUS005, the customer ID is not required, only the name of the relation is required.

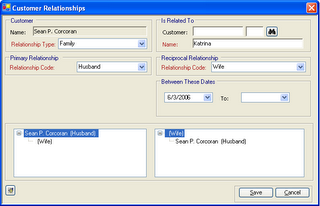
When you enter them, the name is stored in the CUS_RELATIONSHIP.RELATED_NAME field of the database.

The begin date could be used to store brithdates or anniversaries for these relationships.


Applies to: TIMSS6

Monday, January 15, 2007

Process Tracking with Contact Tracking

We have a couple process that have several steps: a foundation compliance process and a publication award process. We use contact tracking to handle both of them.

I've created and overall topic for the process. Each step in the process has a different subject under that topic which are entered as follow-ups, or child records.

Theses processes are for the companies, but the person contacted is the person we contact in reference to this process. The person contacted on the follow-ups can be used for judges or reviewers.

We then have reports that pull all this data together in a readable format along with other pertinent data about the customer: class, status, size.

One of the processes was previously done in an access database, but the data was not in sync with TIMSS and thus mistakes were made with eligibility and other criteria. They tell me it's now much easier and the data is better.

Applies to: TIMSS5 & TIMSS6

Monday, January 08, 2007

TIMSS 6: Ad-Hoc/Search Results Order

When using the Ad-Hoc Query or Search screens, you can not only control how you search (see TIMSS 6: Searching for other fields) you can also control how they are displayed when they are returned.

Highlighting one of the Fields To Display and using the up and down arrows will allow you to choose the order in which the resulting columns are displayed in the Search Results pane.

Results are sorted by the column that is displayed first.

Applies to: TIMSS6

Monday, January 01, 2007

end_date>=getdate()

There are several pieces of data that have begin and end dates in TIMSS. Writing queries to see when that is valid is usually written:

begin_date<=getdate() and end_date is null or end_date>=getdate()

Customer relationships are this type of data. With a query where the end date is greater than or equal to, it implies that if the end date is today, we still want the relationship to be valid. Unfortunately, this will not be the case because time is included with the getdate() function.

The end date is stored in TIMSS without time: 2006-12-31 00:00:00.000, whereas getdate() is returned with time: 2006-12-31 06:48:06.710. When the comparison is done, the time portion makes them never equal, unless the getdate() function was called exactly at midnight.

In my MS SQL database I have a function called TRUNCDATE written by TMAR (there is a similar base function in Oracle). Using this you can remove the time portion of the date so that when the date portion in the comparison is equal, the relationship is still valid.

begin_date<=getdate() and end_date is null or end_date>=dbo.TRUNCDATE(getdate())

If you don't have this function in MS SQL, it's below:

CREATE Function TRUNCDATE(@PDTDATETIME AS DATETIME)
RETURNS DATETIME
AS
BEGIN
RETURN CONVERT(DATETIME,(CONVERT(VARCHAR(50),@PDTDATETIME,101)),101)
END

Applies to TIMSS5 & TIMSS6

Monday, December 25, 2006

Spell Checking Job Titles

Here's a simple idea to help with data integrity. Write a report or query that pulls distinct job titles from TIMSS. Put the results into Microsoft Word, or similar application, and run the spell checker. When you find one that's not spelled correctly, search for it in TIMSS and fix it.

Note that if you are pulling job titles from customers or addresses it will affect where you search for the spelling mistake.

You can do this for other fields, product descriptions for example, where the words would be found in a dictionary.

Applies to: TIMSS5 & TIMSS6

Monday, December 18, 2006

TIMSS 6: Short Pay Codes

When setting up rate structures for products in TIMSS there is an option for the Short Pay Code under each rate code:

ADJUST- Accept whatever is paid
AR- Create Receivable
REJECT- Do not activate Order unless fully paid

This code is used by TIMSS when the full amount is not paid for a product. ADJUST could be used for fundraising products where you will accept what ever amount is paid by the customer. AR makes the line status Active and creates a receivable in TIMSS for when you want to give them the product but are going to go after them for the remaining balance. REJECT keeps the order proforma until the full amount is paid (you don't want receivables).

If a user tries to make a short pay order Active and the Short Pay Code is REJECT they will receive the following message:


You should also note that once an order becomes Active, you can not make it Proforma again.

Applies to: TIMSS6

Monday, December 11, 2006

TIMSS 6: Quick Pick Products Configuration

On the Call Center screen, there is an area for quick picks where your users can easily place order for products (see TIMSS 6: Ordering Multiple Products).

You can control what products are displayed on this panel of the Call Center screen on the User Quick Picks Setup screen (MRM000A).

One thing I didn't like about this screen were the check boxes at the bottom, in particular the Make Quick Pick Product Available for All Users. I didn't want to make this screen available to all staff since they could control what others saw. We don't use Fund Raising so the other is not applicable to us.

So I hid these controls using Extender. Now everyone has access to this screen and they can only change what their own quick picks are.

This data is stored in the PRODUCT_QUICK_PICK table. The two notable columns in the table are the PUBLIC_FLAG and the USER_ID. If the PUBLIC_FLAG is Y then all users see this quick pick product. If it is N then only the person in the USER_ID column sees it in their quick picks.

Applies to: TIMSS6

Monday, December 04, 2006

TIMSS 6: CUS_ALIAS Table

That the CUS_ALIAS_TABLE is where TIMSS stores the aliases you create for a customer. Important fields in the table are the CUS_ALIAS_SEQ, ALIAS_CODE, and SEARCH_NAME.

The SEARCH_NAME is the alternate name that a user can search for and pull up this customer.

The ALIAS_CODE is a user defined code (the type is ALIAS) that can be used to describe each alias entered in the table. I have

  • ALPHA- The name we would use to sort this customer (company) alphabetically. The Joe Smith Foundation, would have an alias of SMITH, JOE FOUNDATION. The Community Foundation of Greater Green Bay would have an alias of GREEN BAY, COMMUNITY FOUNDATION OF GREATER. Since we store these as alias instead of elsewhere, they can be used when searching.
  • MAIDEN- Maiden Name- to store a woman's maiden name
  • ACRONYM- Acronym (COF for Council on Foundations)
  • ALT-SPELL- Alt. Spelling- SMITH;ROBERT or SMITH;BOB, or we use it when a name has alternate characters.
  • DBA- Doing Business As- some organizations use multiple names

The ALIAS_CODE is not a required field, but is very useful for tracking why an alias is used.

The CUS_ALIAS_SEQ is a sequence number and used as a key in the table, each entry getting the next number. However, the alias with a CUS_ALIAS_SEQ of zero is the primary SEARCH_NAME and is the same as the SEARCH_NAME in the customer table. You can not edit this primary alias on the Alias screen (CUS007) and can only change it by changing the customer's actual name.

I had some old converted data where the primary SEARCH_NAME in the CUS_ALIAS_TABLE did not match the SEARCH_NAME in the CUSTOMER table, so that something you might want to check.

Applies to: TIMSS6

Monday, November 27, 2006

TIMSS 6: Revenue Distribution with Fixed Amount & Remainder

Our membership dues are calculated on a dues schedule and can be from $400 to $50,000. We wanted to have the first $400 go to one revenue account and the remainder go to a second account.

When setting up the revenue distribution you will setup 2 pairs by priority.
  • For the $400 revenue pair, the % should be 0, the priority should be 1, and the amount 400.
  • For the next revenue pair, the % should be 100, the priority 2, and the amount all 9's.

Applies to: TIMSS6

Monday, November 20, 2006

TIMSS 6: Online Report Parameter Pick List

So you've written a Crystal report and attached it to a screen, and one of it's parameters needs to be one a few specific values. You can use the List SQL at the bottom of the screen to allow users to select certain values.

You can put a query here to pull values to show in a list. Something from types and codes:

select code from app_code where subsystem='CUS' and type='GENDER'

or if your parameters don't exists anywhere you could use the following query:

select 'NORMAL' union select 'CFLT'

to get a listing of just NORMAL and CFLT.

When the report is run, there will be binoculars next to the field that the user can click on and select a value from the list. You should note that this List SQL is available for each parameter, so which ever row you have highlighted in the parameter table above the List SQL box will be the parameter that you are creating the list for.

Applies to: TIMSS6

Monday, November 13, 2006

TIMSS 6: Hot Key your Buttons

If you've added a button to a screen, you can make it so a hot key will click your button. In the customizer, all you need to do is name the button with an ampersand before the letter that you want to be the hot key.

So if you added a Google button to a screen and you want Alt-G to launch the click event, you'd put an "&" before the G in the Text property of the control.


Then the button will be labeled Google and Alt-G will start the click event. Make sure that there are no other hot keys for that letter.

Applies to: TIMSS6

Monday, November 06, 2006

Prepayment Liability Account

I was going though old emails on the listserv today and came across this from Tom B. regarding the Prepayment Liability Account. It's helpful information.

The name actually has been used in TIMSS for over 20 years and originally came from an accounting professor at the University of Chicago who consulted on the first design of the old RAMS accounting system and has been used ever since. (I even heard today that iMIS uses the same term but I can't verify that personally.)

The idea and accounting behind it is that when money comes into the organization and is applied to an order that has not been invoiced yet, you cannot consider that to be any kind of revenue because you haven't fulfilled any commitment on your part, i.e. shipped a product. When there is an active order for membership or subscription, the typical thing is to call these amounts Deferred Revenue. For inventoried products, these prepayment amounts are obviously liabilities to the organization until the product is shipped. If you don't ship, you owe the customer the money back. Once shipping takes place, the amount is transferred to a revenue account. Thus begat the term "Prepayment Liability" since this was an amount applied to a specific order prior to shipping and was applied to a GL account that appears on the liability section of the balance sheet. So, a PPL is a liability account. It is a form of deferred revenue but a special one that separates money received that isn’t yours yet because you haven’t invoiced versus money you know you will earn if you only follow through with scheduled deliveries of subscriptions or memberships.

Applies to: TIMSS5 & TIMSS6

Monday, October 30, 2006

TIMSS 6: Internal Staff Listing

We wanted to generate an internal staff listing with phone numbers, room numbers, departments, pictures & bios from TIMSS. I didn't want to add department & room to the customer table since this information is only for a few customers.

So I added these fields to the SEC_USER table and the User Setup screen (SEC001) : master customer id, room, department. This way I can join SEC_USER with CUSTOMER and get all the information I need (I had already added a BIO field on the customer table). I also setup a type for department and used a validation code to populate a drop-down on the screen.

Now I just need to make sure my staff all have customer records and user ids.

Applies to: TIMSS6

Monday, October 23, 2006

TIMSS 6: "The" Company Names

In TIMSS 6, TMAR added a Prefix field for a company's name. This is where you can store the word "The" for a company's name. For example The Council on Foundations would have Council on Foundations as the the company's name and the prefix would be The. These 2 would be combined to make the label name The Council on Foundations. The search name for this customer would be COUNCIL ON FOUNDATIONS;THE. It's very similar to how first and last names are stored for individuals.

There are 2 places where you will see this Prefix field: on CUS001SF where you create a company; and CUS003 when you can edit a company's name.

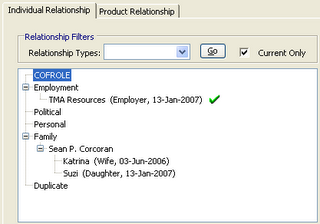
If all your companies are stored this way, you don't have to search for the name with and without the "The" in the name. Thus you have less chance of creating duplicates.

There were some minor issues with this functionality, but they are fixed as of version 6.3.1.

Applies to: TIMSS6

Monday, October 16, 2006

TIMSS 6: Short-cut Keys

In TIMSS 6 there are serveal "hot keys" you can use so you don't have to use the mouse all the time (TIMSS 5 also has them). Here is a listing from the TIMSS 6 Help:
ActionKey-stroke Combination
Adding a New RecordCtrl + N
Deleting a RecordCtrl + D
Saving a RecordCtrl + S
Find / QBECtrl + Q (or F10)
Open Search/Binocular ScreenCtrl + F
Navigating between screensCtrl + F6
Navigating between tabsGo to the tab header and then use the left and right arrow keys to move between tabs
Close the active windowCtrl + F4
Close the applicationAlt + F4

Also, many buttons will have a letter underlined that can be used with the Alt key to "click" the button. For example the C is underlined in this cancel button:

Hitting Alt+C will be the same as clicking on this Cancel button.

Applies to: TIMSS 6

Monday, October 09, 2006

TIMSS 6: Opening IE from TIMSS

This is really cool! So if you add a button to a screen in TIMSS and put the following in the OnClick event:

Dim myTargetURL As String = "http://www.google.com"
System.Diagnostics.Process.Start(myTargetURL)


When you click on the button it will open up IE outside of TIMSS and go to the given website.


So I added a "Google" button to my Company screen (CUS001C) and put in the following for the OnClick event:

Dim myTargetURL As String = "http://www.google.com/search?hl=en&lr=&q=%22" +Myform.getformControlByName("txtCustName").text +"%22&btnG=Search"
System.Diagnostics.Process.Start(myTargetURL)


This passes the company name to Google and does a search. I added quotes (%22) around the name so it would be an exact match.

Or if you wanted to search the news instead, replace http://www.google.com/search with http://www.google.com/news in the passed URL to search for the company name in the news.

Applies to: TIMSS6

Monday, October 02, 2006

SQL Server: TitleCase function

For those of you switching from Oracle to SQL server, one function that is missing is the InitCap that makes the first letter of every word capitalized. It's a handy function to have when cleaning up data.

I have an SQL book that gives the following function that does the same thing.


CREATE FUNCTION TitleCase (@StrIn NVARCHAR(1024))
RETURNS NVARCHAR(1024)
AS
BEGIN
DECLARE
@StrOut NVARCHAR(1024),
@CurrentPosition INT,
@NextSpace INT,
@CurrentWord NVARCHAR(1024),
@StrLen INT,
@LastWord BIT

SET @NextSpace = 1
SET @CurrentPosition = 1
SET @StrOut = ''
SET @StrLen = LEN(@StrIn)
SET @LastWord = 0

WHILE @LastWord = 0
BEGIN
SET @NextSpace = CHARINDEX(' ',RTRIM(@StrIn), @CurrentPosition)
IF @NextSpace = 0 -- no more spaces found
BEGIN
SET @NextSpace = @StrLen
SET @LastWord = 1
END
SET @CurrentWord = UPPER(SUBSTRING(@StrIn, @CurrentPosition, 1))
SET @CurrentWord = @CurrentWord +
LOWER(SUBSTRING(@StrIn, @CurrentPosition+1, @NextSpace - @CurrentPosition))
SET @StrOut = @StrOut +@CurrentWord
SET @CurrentPosition = @NextSpace + 1
END
RETURN @StrOut
END


Applies to: TIMSS5 & TIMSS6